Right now, Skype was used by millions of users to make and receive video calls. However, it has a few drawbacks. The are plenty of bugs in the desktop clients which welcome users by throwing error messages. Recently, we have received multiple messages from our readers regarding the ‘Skype messaging unavailable’ error message. Also Read: Best Free Tools to Check SSD Health in 2020
Steps To Fix ‘Skype Messaging Unavailable’ Error Message
So, if you are also getting the same error, then you have landed on the right webpage. In this article, we are going to share some of the best methods to fix Skype messaging unavailable error message from Windows 10.
1. Deleting the Shared.xml file
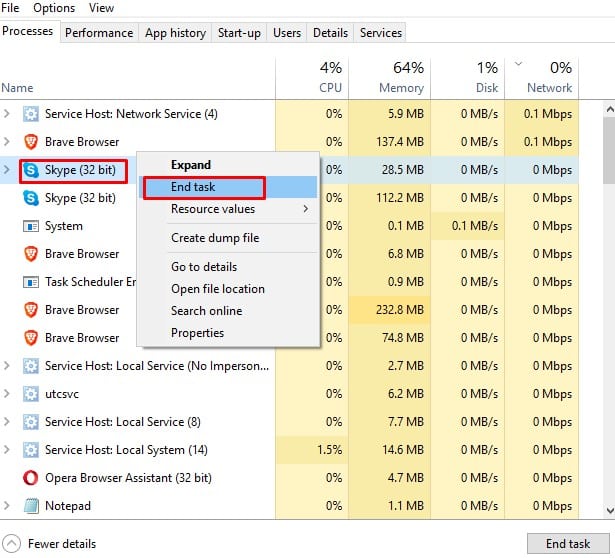
Lots of Skype users have reported that they have fixed the ‘Skype messaging unavailable’ error message by deleting the shared.xml file. However, there’s no assurity that it will get the error fixed, but you could try this one. So, here’s what you need to do. Step 1. First of all, open task manager on your computer and then right-click on the Skype app and select ‘End Task’
Step 2. Now, you need to open the RUN dialog box on your windows computer. For that, press Windows Key + R.
Step 3. Now on the RUN dialog box, enter ‘%appdata%skype’ without quotation mark and press the Enter button.
Step 4. In the next step, you need to find and delete the shared.xml file. That’s it, you are done! After deleting the shared.xml file, restart the Skype client to fix the ‘Skype messaging unavailable’ error message.
2. Update Your Skype Application
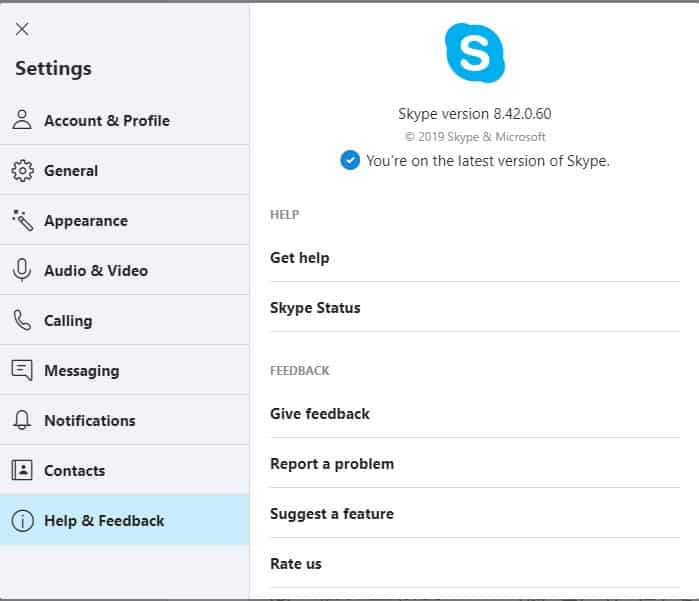
The older version of the Skype app for Windows has some bugs which had been fixed in the latest version. So, if you are running an outdated version of Skype, then it’s pretty obvious to get error messages like ‘Skype messaging unavailable’. So, you need to update your Skype app to the latest version to fix Skype messaging unavailable error. Step 1. First of all, open Skype on your Windows 10 computer and then click on ‘Help and feedback’
Step 2. In the next step, click on ‘Check for Updates’
That’s it, you are done! Now skype will automatically install the updates. Once updated restart the Skype client to fix Skype messaging unavailable error message.
3. Reset Skype Application
Well, lots of Windows users on the Microsoft forum have said that resetting the Skype application has fixed the Skype messaging unavailable error message. So, if the above methods failed to fix the error message, then you can consider resetting the Skype application. Follow some of the steps given below to reset the Skype application.
First of all, open Start Menu and click on ‘Settings’ Now click on Apps and locate Skype. Next, click on Advanced options and then select ‘Reset’
That’s it, you are done! This is how you can reset the Skype application to fix Skype messaging unavailable error message.
4. Reinstall Skype Application
If you are still getting the Skype messaging unavailable error message even after following the methods given above, then you need to reinstall the Skype application. Reinstalling the skype will reset all user-made settings which will fix the error as well. So, here’s how you can reinstall Skype on Windows 10. Step 1. First of all, open Control Panel on your Windows 10 computer.
Step 2. Now in the list of installed apps, search for Skype. Step 3. Now click on it and select the option ‘Uninstall’
Step 4. Once uninstalled, reinstall the Skype application once again. That’s it, you are done! This is how you can fix Skype messaging unavailable error message by reinstalling the Skype client. So, these are some of the best methods to fix Skype messaging unavailable error message. I hope this article helped you! Share it with your friends also. If you have any doubts related to this, let us know in the comment box below.
Δ
